Blender 2.64 - Tutorial - Intro to Masking (Rotoscoping)
This page covers the steps I followed to get a simple masking workflow up and running in Blender. I am going to skip over the details of the basic scene setup as its covered in tutorials elsewhere on the internet.
Scene Setup
A plane mesh object is uv mapped with a texture and a simple Cycles material note tree is setup. There is a light in the scene above the plane. The scene render resolution is the same as the resolution of the image. (You can check the image properties in the Image Editor and use the values in the Render properties panel.)
Masking Workflow
I have configured the screen in Blender to display the following Editor types
['INFO', 'PROPERTIES', 'NODE_EDITOR', 'IMAGE_EDITOR', 'VIEW_3D']
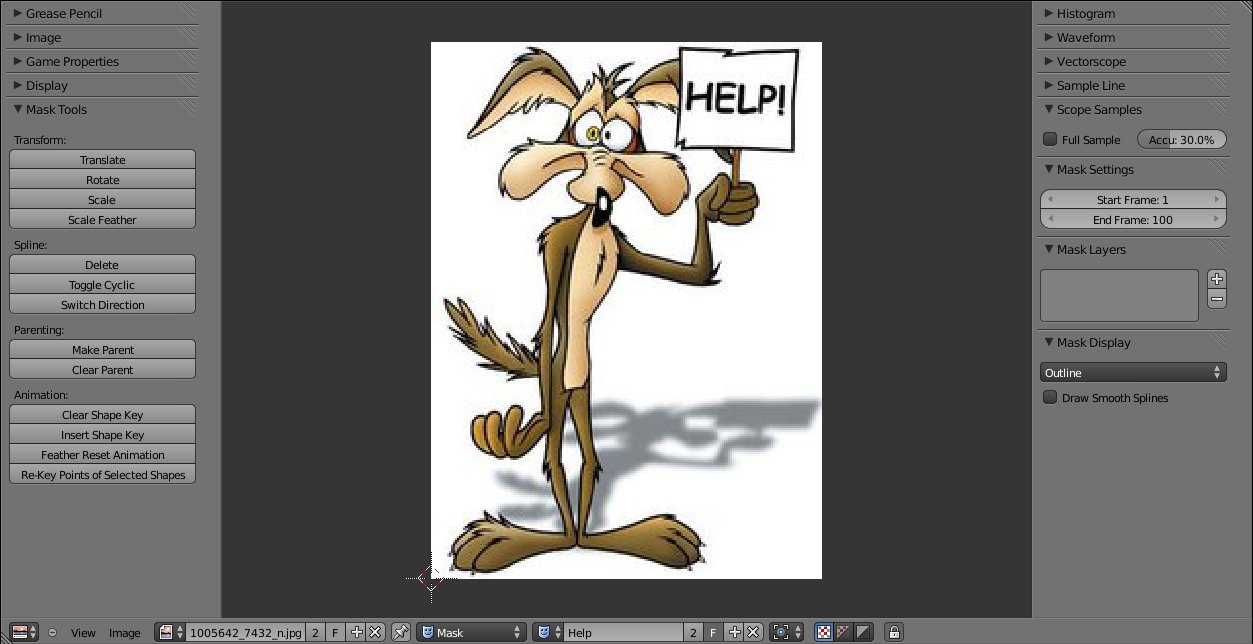
In the screenshot below, You will notice in the IMAGE_EDITOR that I switched to the Mask view mode and also created a Mask data block and names it "Help".
The following UI features are notable in the Image Editor showing the mask mode.
['INFO', 'PROPERTIES', 'NODE_EDITOR', 'IMAGE_EDITOR', 'VIEW_3D']
In the screenshot below, You will notice in the IMAGE_EDITOR that I switched to the Mask view mode and also created a Mask data block and names it "Help".
The following UI features are notable in the Image Editor showing the mask mode.
- T-KEY : Panels on Right
- Mask Settings Panel
- Mask Layers Panel
- Mask Display Panel
- N-KEY: Tool Panels on Left
- Mask Tools Panel
Under the Mask Layers Panel, click on the + sign to add a Mask Layer.
- CTRL+LMB click to create the MaskPoint.
- A MaskPoint consists of the point itself and a handle.
- Continue clicking to create three more points in a rectangular/square pattern.
- Press ALT+C to close the shape (Cyclic)

Once you add a spline (consisting of a set of points), two extra panels appear
- Active Spline
- Active Point

You can increase the feathering region by
- Selecting all the spline points (A-KEY)
- Pressing ALT+S and moving the mouse around.

For transforming the points/mask layer around
- G-KEY for translation
- R-KEY for rotation
- S-KEY for scaling
You can switch the direction of the feathering region by clicking on the Switch Direction button found under the Mask Tools Panel.

To add more points
- on the Mask spline, CTRL+LMB click and drag mouse.
- on the Feather spline (Green color), SHIFT+LMB click and drag mouse.

Image Editor is just used to create a Mask. In order for us to see it, we must goto the Nodes Editor and switch to the Compositing view. Also, press F12 to render the scene.

Add a Mask node and point it to the mask that we created above. Arrange the nodes like so.

In the Image Editor, switch to the Render Result and you should not see the mask.

If you switch to the alpha channel view in the Image Editor, you will not see the alpha corresponding to the masked area.

For that to work, connect the output of the Mask node to the Alpha input of the Composite node. (Look in the image below)

You can invert the Mask by clicking on the icon next to the Opacity slider button under the Mask Layers panel. I have also deactivated the Anti-Alias and Feather options in the Mask compositing node. So you see the jaggies.

This concludes my first tutorial covering the very basics. I urge you to read the release notes linked in the next section and enjoy Masking.
If something is not clear, please ask the question in the comments section below and I will gladly answer it and update the documentation as well. I was a little pressed for time, so wrote the tutorial with just the major points.
Thank You.
- S
References
*Update*- Just came across this video tutorial that covers Masking in detail :
Few more experiments under way
Obligatory Suzzane cameo


thnx a lot
ReplyDeleteYou are welcome :)
DeleteWonderful Tutorial, thanks for putting this together! This is obviously one great post. Thanks for the valuable information.
ReplyDelete